Why You Should Use 7-zip
Your hard drive space is a finite resource. There are only so many files you can store on your hard drive before you reach the end of its limited capacity. You could make your storage space larger by buying a bigger hard drive, but this could be a pricey option. An alternative is to simply make your files smaller through a process known as compression. 7-zip is a free software application that you can use to compress your files. With 7-zip, you can take groups of files or folders and place them into a smaller file called an archive. The archive takes up less space on your hard drive than the files or folders would separately.
Maybe you have more than enough space on your hard drive for all of your videos, music, pictures, and documents. 7-zip can still be useful in other cases like sending email attachments. Many email services have a size limit for each attachment that can be sent. You can cheat this system by putting your files in an archive with 7-zip.
Another useful feature of 7-zip is to protect your file with a password. This means if anyone wants to open your files, they will need to enter the correct password. This grants you a strong layer of security to protect important files. For example, if you keep a file sitting on your desktop containing all of your passwords, it’s a good idea to password protect it with 7-zip. Be sure to utilize strong passwords like we suggest here to make it as difficult as possible for someone to access your archive.
Inside the Graphical User Interface
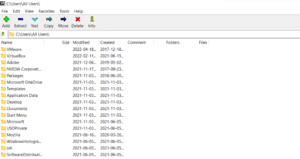 When you open the 7-zip application you will be met with its file manager window. In the toolbar at the top of the window you will see buttons labeled add, extract, test, copy, move, delete, and info.
- The “Add” button allows you to add files or folders to compressed archives.
- “Extract” is how you decompress and take the files out of the archive, returning them to normal.
- “Test” will check if there are any errors in the archive.
- “Copy”, “Move”, and “Delete” are straightforward. You can copy or move a file to another location, and you can delete files directly from the file manager.
- “Info” will open the file properties window.
Adding Files To An Archive
 In the file manager, select the files you want to add to the archive. Then click “Add”.
- Change the archive format 7z or zip.
- Compression level will determine the speed of the operation but will also affect how much space is saved. Store is the fastest but saves no space, while Ultra is the slowest but will save you the most space. Select “normal” as it is fine for most tasks.
- If you want to add a password to the archive you can do it in the bottom right portion of the window, under “Encryption”. If you want to also hide the filenames inside the archive from prying eyes, check the box beside “encrypt filenames”.
- Select “Ok” to start archiving the files.
Extracting Files From an Archive
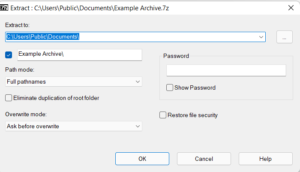 In the file manager, select the archive you want to extract. Then click “extract”.
- You can choose the destination you want the archive to extract to or leave it at the default location.
- If the archive is password protected, enter the password.
- Click ok to begin the extraction.
Working From Windows Explorer
 You can also use 7-zip to archive and extract files directly from windows explorer. If you right click on a file, you should see 7-zip as an option in the context menu. On Windows 11 you will have to click show more options first. If you hover over 7-zip you will see multiple options including “add to archive”. This brings you to the familiar menu discussed earlier in the “adding files to an archive” section. The same can be done to extract files but choose “extract here” or “extract files” when hovering over 7-zip.