Making your Wifi Hum
In another blog, we explained some of the best practices to secure personal or Small Office Home Office (SOHO) WiFi routers. After security, the next most common topic we’re often questioned about home router configurations is “What can I do to improve my terrible WiFi?” Below, we’ll highlight a few settings you can review and test to help you determine that sweet spot of security and balanced efficiency at home.
Before diving into configuration changes, it would be helpful to understand a little about how WiFi works, and the easiest way would be to relate your router’s internal radios to your car’s radio.

A Quick Primer on Frequency Bands and Channel Bandwidth
Whether a physical stereo or a touch-screen interface, your car’s radio likely has a button or feature called “Band” which toggles between AM and FM. Normal AM radio broadcasts take place on the very low end of the electromagnetic spectrum, between .525 MegaHertz (mHz) and 1.705 MHz, while FM stations are licensed to operate much higher, between 88 and 108 MHz. When you press that band button, the radio is tuning to the appropriate frequency band or range within the electromagnetic spectrum. As we’ll see shortly, WiFi routers can also operate in different bands and spending a moment to manage your router’s channels settings could have a serious impact on your home WiFi speed and efficiency.
Going back to the car stereo, have you ever listened to an AM station and thought “this sounds tinny and thin” or “This sounds like hot garbage compared to an analog FM radio station”? Part of that is the modulation technique, radio interference from power lines and motors, and a number of other external factors, but a major element to the quality difference is the signal’s bandwidth or size. If you think about the efficiency of a highway, the more lanes there are the more cars can travel simultaneously. This increase in capacity is similar to bandwidth–a wider signal can carry more data, increasing the overall quality or throughput of the channel. The disparity in quality between AM and FM can largely be attributed to the bandwidth difference, where AM uses a nominal bandwidth of 10 Kilohertz (KHz) while FM channels are 20x larger, at 200 KHz. That increased signal size provides a larger envelope, or highway, for data to pass through, making the FM Top 40 music station more robust and clear than the regional talk radio show on AM. This comes into play with modern WiFi routers, where you can double and even quadruple the highway lanes for better and faster WiFi at home.
So, with that out of the way, let’s explore some tips to improve WiFi quality.
Tips to Boost Your WiFi Network’s Quality
- Use a modern WiFi Router
- As technology improves, so does signal quality and speed. Upgrading your SOHO router to the latest standard ensures you’re operating with the best speeds and features. WiFi standards can be broken into a few major groups:
- WiFi 1-3, or 802.11a/b/g – Outdated legacy stuff, try to avoid
- WiFi 4, or 802.11n – “Ol’ reliable”
- WiFi 5 or 802.11ac – The new standard
- WiFi 6 or 802.11ax – The future, plus a new band in the 6GHz range!
- As technology improves, so does signal quality and speed. Upgrading your SOHO router to the latest standard ensures you’re operating with the best speeds and features. WiFi standards can be broken into a few major groups:
- Survey your WiFi environment
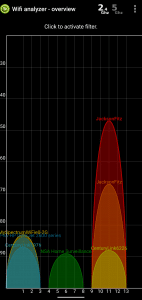
- Take control of where your WiFi router’s radios are transmitting. Modern routers often include “Auto” channel selection which should scan the available frequency bands to identify noise and neighboring routers so it can choose an unoccupied or the least busy channel. But why risk it? You can download a simple phone app, like “WiFi Analyzer” and view a graphic spectral display of where your neighbors’ routers are transmitting and where they’re not. The goal is to find a quiet spot in one of the bands where no other WiFi signal is transmitting. If two or more WiFi routers are configured for the same channel, the others will appear as noise or interference, often introducing loss and requiring re-transmissions. This will slow down your WiFi, so find something clean and quiet.

WiFi Analyzer – Survey view of the 2.4GHz band
- Take control of where your WiFi router’s radios are transmitting. Modern routers often include “Auto” channel selection which should scan the available frequency bands to identify noise and neighboring routers so it can choose an unoccupied or the least busy channel. But why risk it? You can download a simple phone app, like “WiFi Analyzer” and view a graphic spectral display of where your neighbors’ routers are transmitting and where they’re not. The goal is to find a quiet spot in one of the bands where no other WiFi signal is transmitting. If two or more WiFi routers are configured for the same channel, the others will appear as noise or interference, often introducing loss and requiring re-transmissions. This will slow down your WiFi, so find something clean and quiet.
- Choose someplace quiet
- After surveying your environment, you can manually assign your WiFi router to transmit on a particular channel. Sharing a channel with a neighbor or two isn’t a deal-breaker, but the cleaner the signal the better. You’ll find in the 2.4 Gigahertz (GHz) band that most WiFi routers tend to transmit on channels 1, 6 or 11 here in the US. These three channels are considered non-overlapping, so three neighbors can live in close proximity and not interfere with one another. That doesn’t help much in high-density locations, so consider looking into the 5 GHz band where all 20+ channels are considered non-overlapping at the default bandwidth, and there’s often a little more wriggle room.
- Periodically check back to see what new devices are being installed nearby — you may find a neighbor has decided to transmit on the same channel as your network
-

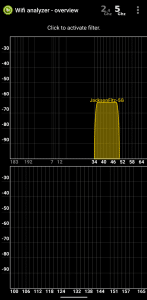
The 5GHz band is awfully quiet in my cul-de-sac. That network’s bandwidth was increased to 80 MHz compared to the default of 20MHz!
- Set the appropriate BW
- Unlike AM/FM radios, modern WiFi protocols allow you to increase the bandwidth of your signal. Based on your survey findings, you can increase the standard 20MHz channel to 40, 80, or 160 MHz! That’s a lot of lanes! Something that must be considered when increasing bandwidth is that your new wider signal will cross over adjacent channels, and may interfere and experience interference because of devices transmitting on those channels. So, during your survey, you’ll want to double-check that increasing your bandwidth won’t cause interference.
- Restrict old or legacy devices from your networks
- By default, WiFi routers usually communicate at the speeds of the slowest device on the network. Otherwise, you could have a dozen quick-talkers efficiently and seamlessly transmitting and receiving, only to have a slow-talker break in and interrupt the entire network’s flow. To mitigate this, the network will throttle speeds so that all devices can be on the same page. There are administrative options, like Greenfield or HT/VHT modes, that can restrict access to only allow modern devices capable of the fastest speeds. By enabling these options, you’ll kick off legacy devices like PS3 and older phones tablets, but should discover an overall network increase in speed. This is a good use case for the Fast network + slow network set-up below.
- Split your network
- One technique to increase quality and speed is to use a multi-band WiFi router to create separate networks that serve different purposes. For example, you could create a WiFi 4 (802.11n) 2.4 GHz network that is meant for some non-media smart appliances, maybe a Roomba and IoT hub. Then you could create a Wifi 5 (802.11ac) 5GHz network, with increased bandwidth that restricts older devices, that can serve your streaming devices, like Rokus, computers, and phones. This way, you have options when introducing devices to the home network, whether it’s an old PS3 that you can park on the slow network, or your visiting in laws, who also get parked in the slow network.
- Another note about frequency bands– you’ll find that the 2.4GHz channels reach much further than the 5GHz due to radio wave propagation effects. Consider that when configuring your split network at home.
- Enable or Disable Quality of Service (QoS) or WiFi Multimedia (WMM)
- QoS can help or hurt home WiFi routers. They really shine in Enterprise environments when latency and roaming are major issues, but I’ve found it’s best to leave this alone at home. If interested though, you can test different settings to prioritize specific traffic (e.g. streaming video) or specific devices (Amazon Firestick). You’ll need to observe the impact to other traffic and devices while this is enabled–you could find your email won’t pull normal updates when someone is playing a computer game in the next room. A little trial and error may help find a good balance.


